I have perhaps 2-3 hours every night for wood working,
If I'm not too fatigued from my day job;
If I'm not suffering from bouts of depression;
If I felt like continuing the work;
If it does not rain.(Tarpaulin is my friend)

I chose Kapur because that's what the timer merchant had, in terms of price range , size required and weight. At $2.50 (4 x 2s) a foot ($5-6 for the 4 x 4s), it's also resonably affordable. I would describe the wood as hard (like oak) quite dense, and have a smell resembling camphor blended nicely with baby vomit.

The top will be 21 Inches wide by five feet long. 21 inch because of the 6 slabs of 3.5 x 3.5 Kapur wood to be bolted to form the top. 5 feet because any longer, I will not be able to enter my workspace; the balcony. Here (below) you will see one such slab. Each weighs approximately 25-30 lbs. I used a fore plane to correct the cups and warps.
Kapur can be easy to plane, or impossible, depending on the piece. Some may have interlocking and reversing grains that challenge your best tuned planes.

Align all your slabs in the same grain direction!
This is necessary and important when you need to flatten your benchtop later. Mark all the directions clearly. Instead of a felt tip pen,I did my marking with a bamboo sumishashi (a Japanese inspired scrap of bamboo dipped in India ink.) In his wonderful book,"Japanese Woodworking Tools: Their Tradition, Spirit and Use" Toshio Odate describes a typical marking brush. Below is a little drawing if you want to make one. They are typically 6-8" long. One end for writing, the other for scribing lines. The good thing about such pens is that they are cheap and biodegradable, the marks water proof when dry. The scribing tip can be renewed by whittling with a chisel, the pen side with a hammer.

Glorious tear-out encountered. Bench base was knocked a few feet forward. So much for the weight. I charted the plane direction so that subsequent cuts will not take out more chuncks.
 Besides judiciously marking grain changes with arrows, writing some brief words on troubled boards may help you take the best course of planing action the next day.
A seldom discussed discipline in woodworking is knowing when to stop. Some days, all your tools will misbehave, and nothing seems to go right. Take a break. Stop for the day. Tomorrow will always reveal a better approach. I don't know why, but try it.
Some eight months later..
I've completed the tail vice, (not glued up yet, out of a curious apprehension that things may change as the build progresses)

I lined up the planks that will be my benchtop, and I sit the tail vice on top at the right hand corner. (Heck, I've even wedged in a ramp for the tool well. I know many people hate tool wells, for they collect junk.) The idle piece will be one of the end caps.

Trust me, this took the whole evening just for lugging the wood and arranging them. I suddenly remembered what I learned (and what I just wrote on top) from the last bench I built:
YOU DO NOT SCREW WITH KAPUR.
I have previously neglected to align the grain direction. This time, I tested each piece with a Stanley 9 1/2 Block Plane, and I mark them clearly with India ink and a bamboo pen. Failure to do so would result in tear outs the size of Connecticut. (Well, tear outs will still happen with this grain reversed beast)

I also mark each piece with their designated position, such as "front strip, doghole strip, etc)

Spent, I then hauled the planks to their storage.
I looked at the floor and see that it needs sweeping, still my Jointer gently weeps...uh..sorry George
Day 3
I am an instinctive worker by nature, and instinctively, I took out my ebay purchase for sharpening. Instinctively, I suspect I'll need it during the bench build (even though I haven't a shave horse). These are just one of the thousands of things I do to avoid continuation on my bench. What's that word in English again...?
1)Diamond file
2)C-Clamp
3)Procrastination on Bench build
...some 2-3 months later,
If I were to have the top surface of the bench dog flush with the top, it must slope at 10 degrees.
Since I cannot have any dogholes in front of the front vise, (they will protrude below the top and hit the vise itself), I counted six dogholes, if I spaced them 4 inches apart. 4 inches because 3 seemed too close, and with 5 inches, the tail vice will need to be cranked more than half of its 8 inch opening for the next doghole.


12 December 2013
Some of you may regard my bench as nothing more than a poorly assembled block on trestles.
But for me, an epic adventure in hand tools.
The only electricity used on my bench are those powering the light bulb on my swivel lamp.

 |
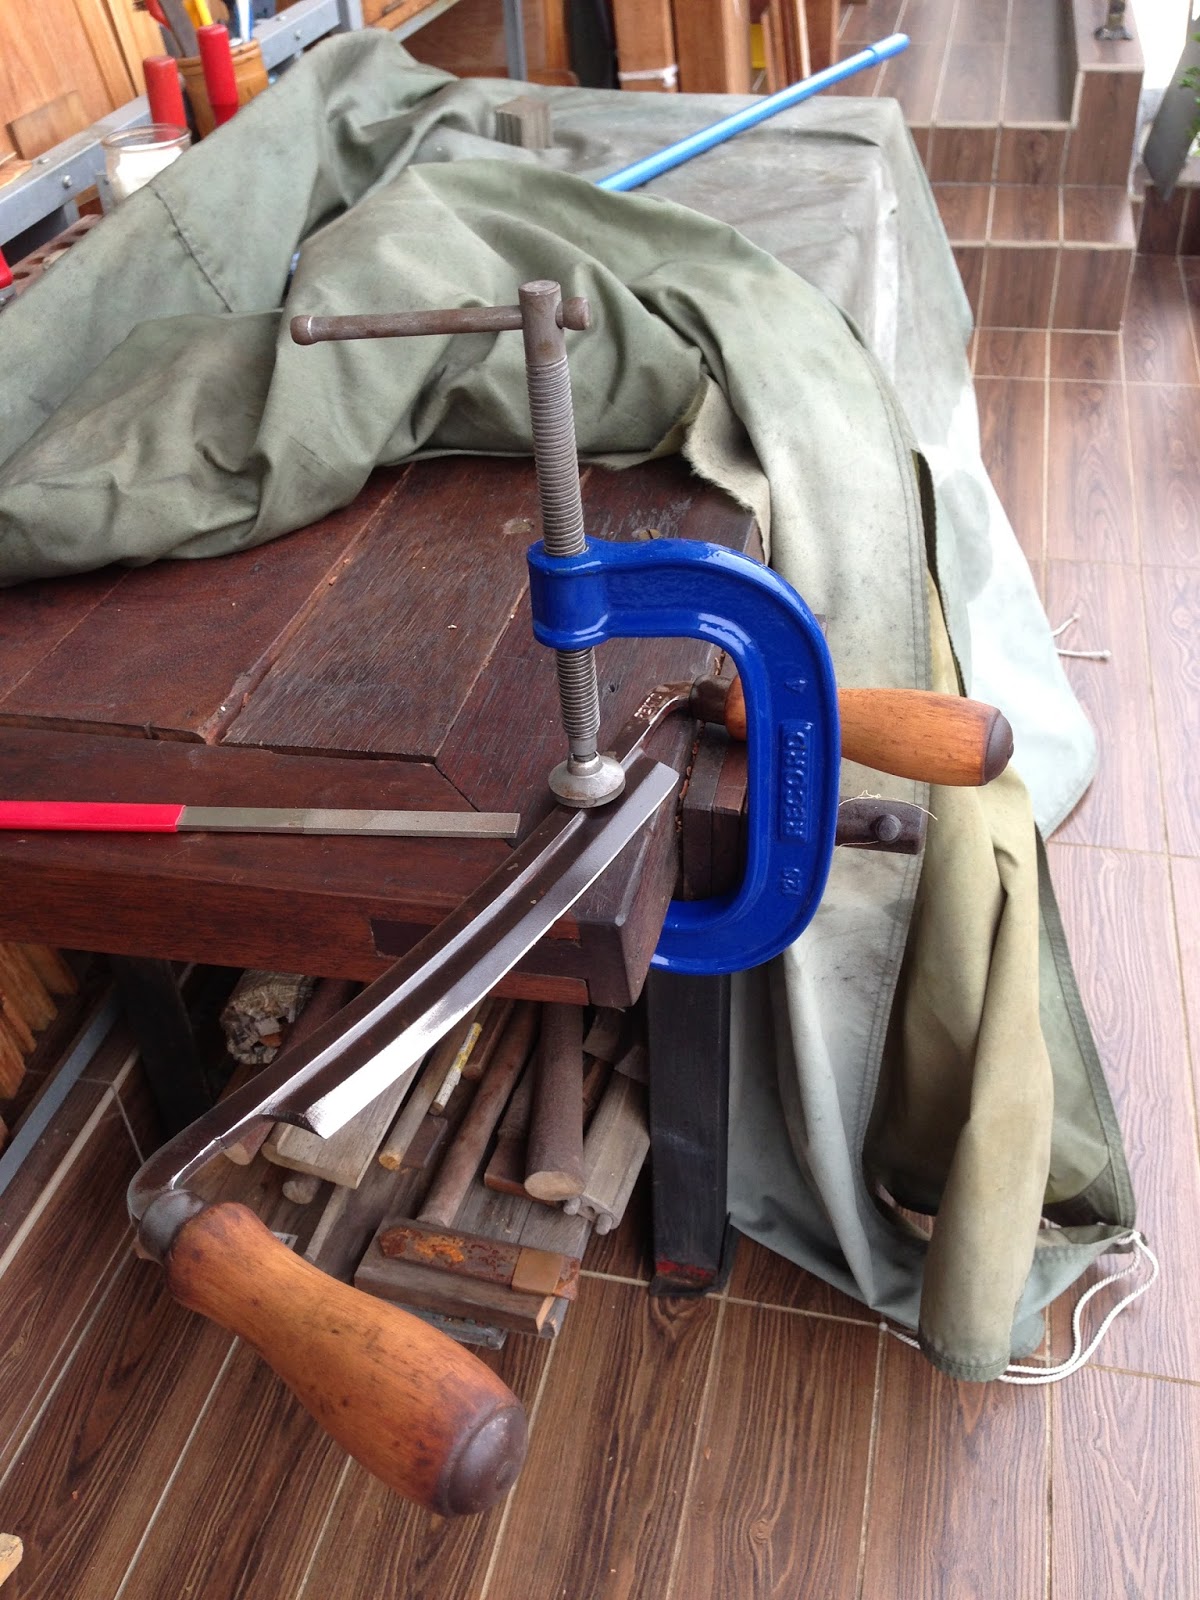
Making sure the dog-holes on the cover align with the end vise block. It will be fastedened with screws and plugged with dowels made with bench top off-cuts like so... I don't own a $50 dowel plate, so it's the Mora that makes the cut 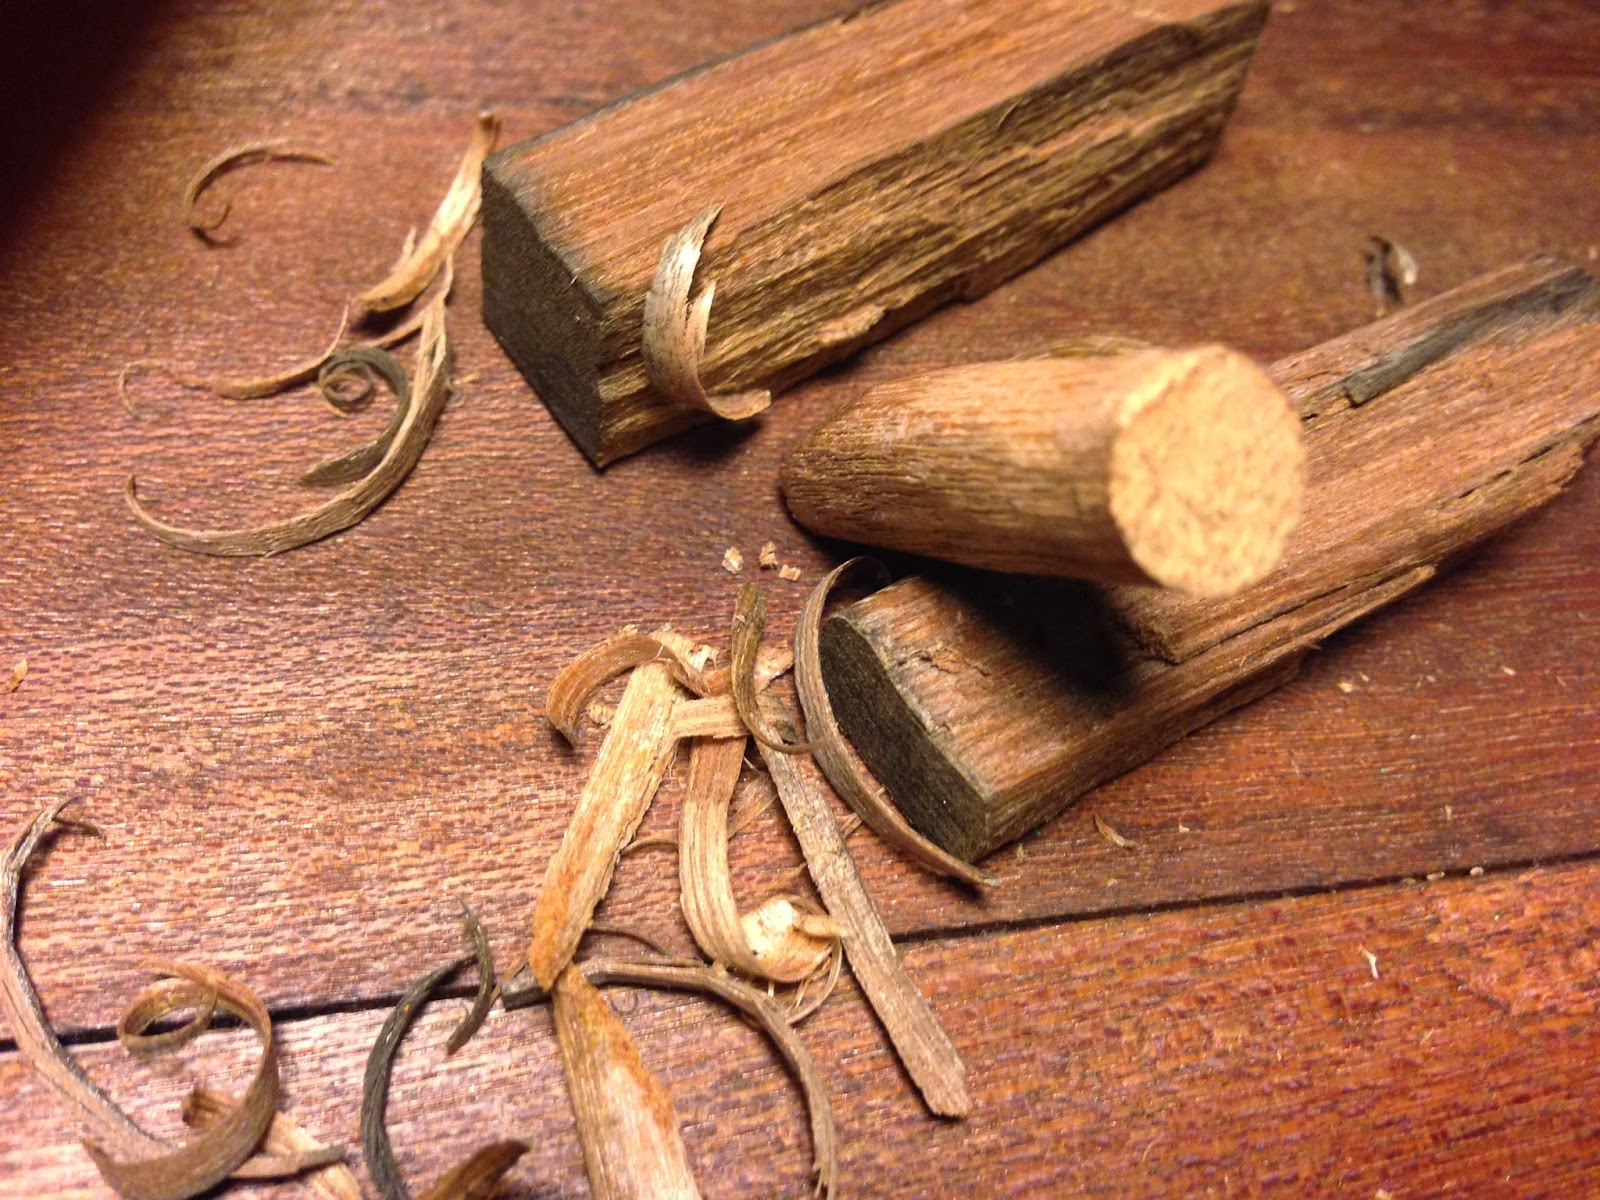 |
 |
| The end vise with the cover to match the bench top thickness. The top consist of slabs held together by 5 piece of 3/8" threaded rods and nuts. I'm starting to bore the first holes here. Holes are oversize to compensate for mis-alignment.  I am relying on my poor memory to document the build. So the sequence of pictures may not be in chronological order, and they may not make muchsense. Here's the ploughing of the groove to fit the tool-well bottom. Tool: Record #044  
And the tool well bottom gets chamfered. This is a solid plank of Nyotoh (Nato) I've been hoarding.
 
For no apparent reason, I am compelled to make the jaw lining for the Record 52 1/2 front vise. I decided to texture the clamp surface, as the wood is very hard and springy. I just do not like Masonite(artificial material in the realm of plywood, MDF and chipboard) or suede leather (peeling, tearing). 45 degrees criss-crossed knife lines, supplemented by an auto centre punch.
Have friction, will not travel.
 The pattern is in part inspired by John Reed Fox's lattice and veritas bench dogs.  
Sometimes, I have problem following myself.
Suddenly, I wanted to force-fit a dollar coin to a shallow forstnered hole to mark the year of my work, but the quality of my work threatens to insult the National Treasury. So I found a more modest way to mark my work: on the washer of the endcap bolt. Frank Klausz had his painted green in the "Workbench Book"
       I flexed and stretched my arms. Then I took out Jason the #7 Jointer   
17 Dec 2013:
So how do you attach a bench top to the base? I've seen carved wooden bullets on each side of the trestle piercing the top, using gravity as the main holding force. I've heard suggestion of pocket screws, and I'll say this: I'll buy a bench from Ikea to use as a woodworking bench before I'll use pocket screws. It just does not feel right to me. Roubo style? Won't work on my bolted top. Looks like I'll be using the good old L Brackets. 4" long, almost 1/4" thick. 1/4" lag screws and washers to match.

Eyeballing, and without much fanfare.
 
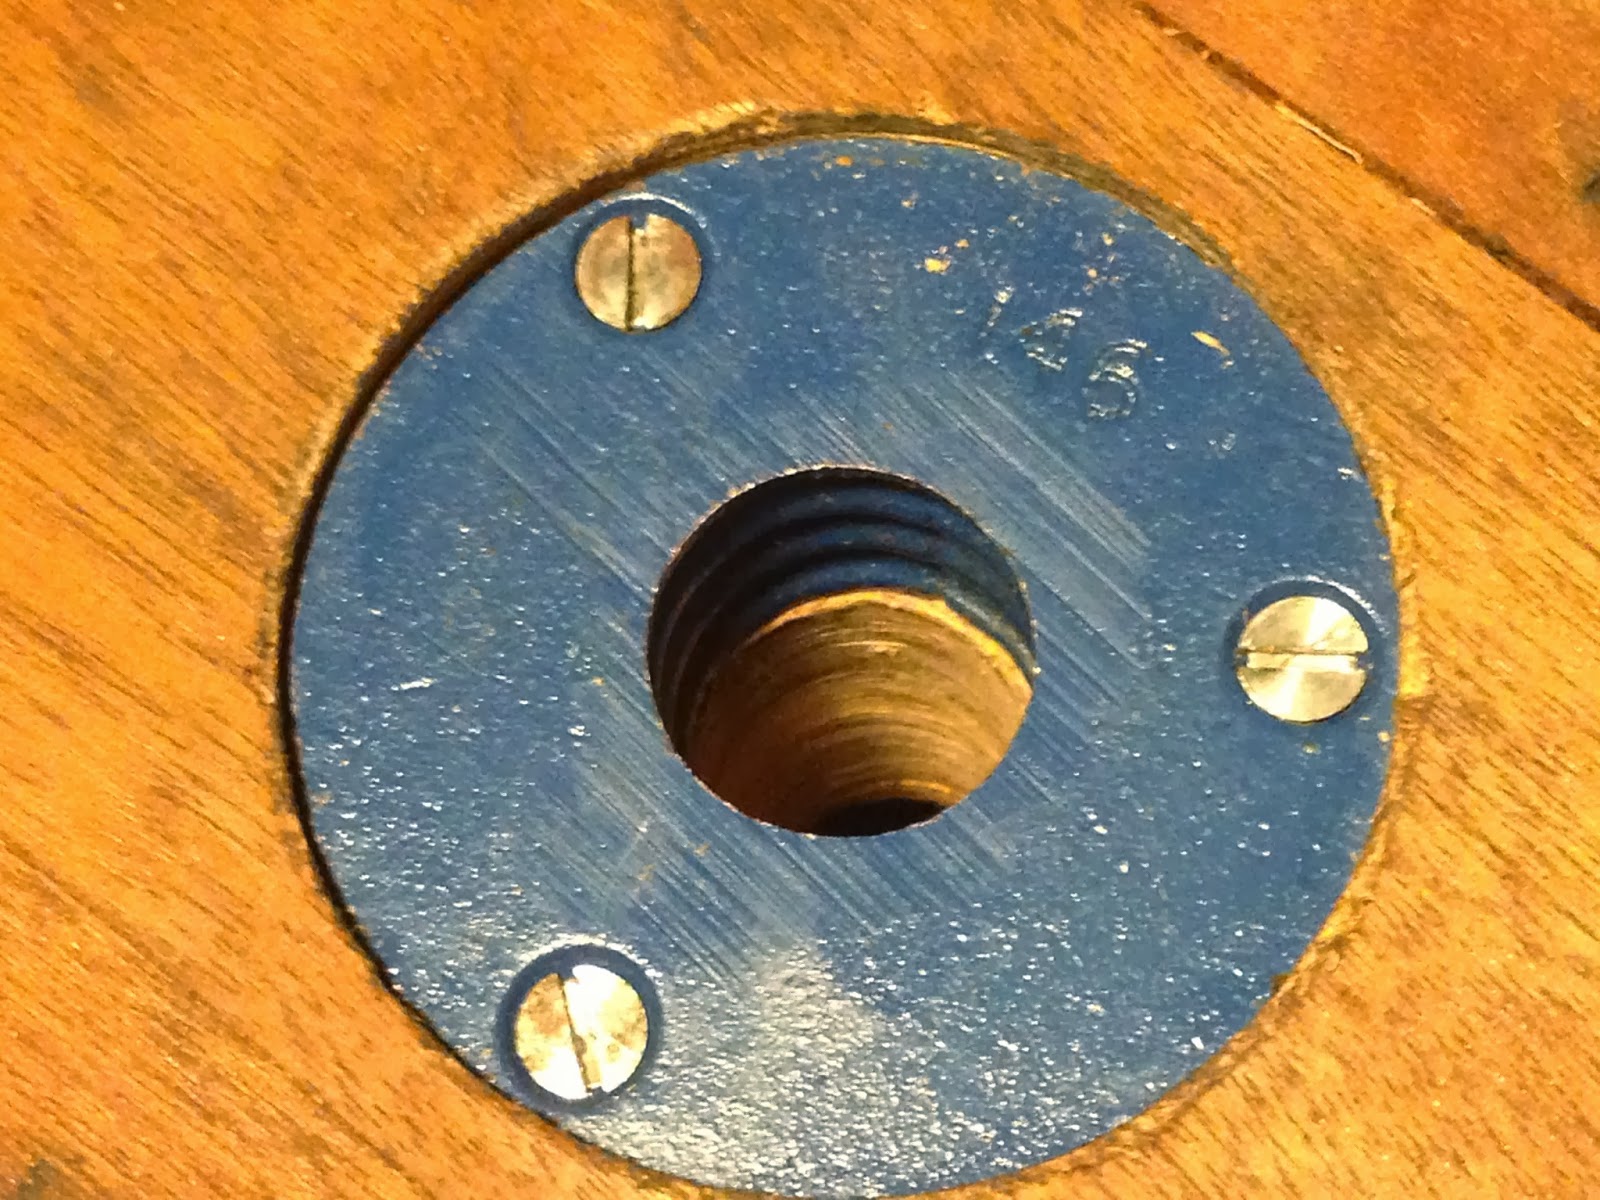
Mounting a Record Bench Holdfast, No. 146
Next up, the Record Bench holdfast.(No.146, the bigger brother of the No.145). While installing, I realised why these are not popular, even in England, judging by ebay.uk listings. Expect to pay more than 20 pounds for a complete set.

These are supplied with 2 cast iron collars, and if your bench comprises of laminated strips less than 3" wide each, any holes bored will weaken the lamination. the collar flange is 2 3/4" in diameter! Record recommends the centre of the holdfast be bored at least 7 9/16" away from the front edge and sides. I bored mine 8 1/2" away to avoid the join lines of my top strips, spaced 24" apart between the 2 collars. Holdfast will work well in a 15/16" hole.
 
I use a chisel to help with waste removal.

When boring a column of concentric holes, you always start with the largest. If you bore the smallest first, the lead screw on the auger will have NOTHING to register. 3 different hole diameter for this collar alone. Below, the RH side completed.
THE RAMP
Somewhere in the middle of building this bench, I had decided on a tool tray. I have had chisels, squares, block planes creep to the edge of the bench, attempting to end their hard, unhappy life. They usually suffer some permanent damage that requires time to put right. Some avoid tool tray simply because it collect shavings and junk. For me, shavings are either on the bench or on the floor; they are a sign of tools being gainfully employed, and they are always there. As for junk, it's personal discipline. The adage" Everything has its place, and everything in place" sums it up. Where there's no discipline, there's pandemonium, tool tray or not.
If you decide to have a tool tray, it is only natural to incorporate a means to remove accumulated debris. Many benches in England simply have an open tool well; The sides are not "walled-in" or blocked. One simply sweeps the shavings out from the tool tray from either ends. Some "new fangled" benches have a removable bottom section on the tray, which incidentally, also adds clamping options. For me, I simply like the look of a slope leading down a tool tray. My bench is hardly square, the tool trays are not uniform in width or depth. So where join lines are concerned, it's another place to screw up. Congratulations to myself.
So here, cutting out the ramp: 6" long, 3/8" thick Nato.
  
The bench, somewhat completed.
 |
Comments
Post a Comment